Tuesday, March 27, 2007

Agent Megatrond?

Here's some news about the live-action Transformers movie. I've always wanted to see something like this as a kid, and despite the changes from the original cartoon and having a terrible director, the new movie still manages to intrigue me from time to time.

The latest report from USA Today indicates that Hugo Weaving will voice Megatron. I can picture it now.

"Welcome to Cybertron...Misterrr Prrriiime"

Brilliant.

They aren't telling what Megatron turns into. Previous rumours indicated he turned into this really horrid-looking "alien jet". For a robot in a disguise that wants to conceal its alien origin, that's a pretty lousy disguise. I hope he turns into a tank or something. That way they can preserve the bad-ass cannon on his arm.

Monday, March 26, 2007

The Children of Húrin

Photo Sharing and Video Hosting at Photobucket

J.R.R. Tolkien's latest posthumous book, The Children of Húrin, will be out 17th April. Edited by his son Christopher, the new book recounts the tragic tale of Húrin and his children, most notably his son Túrin Turambar. Already, the media is looking at a possibility of a film (mis)treatment, based on (of all things) the potential battle scenes in the story. From the linked article:
Tolkien experts are already tipping The Children of Húrin - which features significant battle scenes and at least one major twist - for big budget Hollywood treatment. Takings from the Lord of the Rings trilogy box office takings to date total some £1.5bn.

I don't know how much narrative J.R.R. actually wrote for this book, and how much of the final published work will be Christopher's prose. Still, Tolkien fans will buy it in any case, and the moviegoers who loved Orlando Bloom will flock to the inevitable film version. The audience loves a good battle scene.

Saturday, March 17, 2007

Debugging A Kernel Oops

I used to put up howtos on my old blog, but now that it's gone I want to resurrect some of the most useful ones and post them again. This blog entry deals with how to debug a kernel panic (which happens a lot when I touch kernel code).

So how does one debug a kernel panic? The easiest way is to compile your kernel with CONFIG_DEBUG_INFO (if not available, just add a -g to CFLAGS) and run the vmlinux through gdb. When you're in gdb you can do funky stuff like disassemble functions, show source listings etc., just from hex numbers in the oops.

Consider an oops where a nasty error occurred at EIP:0010:[<c012f8da>]. This happened to me back when was writing code for my MSc. Running the oops through ksymoops (this applies only to kernel 2.4 as this step is no longer required for kernel 2.6 and above; the newer kernels show you function names in the panic message) gave me the following output which showed the name of the offending function.

Code; c012f8da <do_mmap_pgoff+2a/550> <=====

The first part is 0x0010, which is the value of the segment register which you can safely ignore (unless you're messing with the GDT). Then to find out what line in the offending function (offset 0x2a, the 550 is apparently function size) is, you just do this:

(gdb) list *do_mmap_pgoff+0x2a
0xc012f8da is in do_mmap_pgoff (mmap.c:404).
399 unsigned int vm_flags;
400 int correct_wcount = 0;
401 int error;
402 rb_node_t ** rb_link, * rb_parent;
403
404 if (file && (!file->f_op || !file->f_op->mmap))
405 return -ENODEV;
406
407 if (!len)
408 return addr;

Ta da! Line 404 is the culprit. Inspecting the disassembled code, see the register being used to dereference (the one on the left is the source, the one on the right is the destination):

mov 0x10(%edx),%eax

If you look at the register values in the oops:

eax: c171e3e4 ebx: 00000000 ecx: fffffffe edx: fffffffe
esi: 00001812 edi: cf1dbf10 ebp: cf2cbc14 esp: cf2cbbb4
ds: 0018 es: 0018 ss: 0018

It's obvious edx has some bogus value (in this case, -2). And a bogus dereference means, something naughty happened with a pointer, and the only pointer you can see in the line is file. The value of file was set incorrectly to -2, and (if you look at the original source), file is actually a parameter passed to the function. Therefore, you'll need to trace the function that called it by looking at the call trace. You can find out which functions the hex numbers represent by typing disassemble value where value should be a hex number starting with 0x.

Thanks to Zwane, Jeff and Alex for helping me learn how to do this many moons ago.

Tuesday, March 6, 2007

A Guilty Git

For a long, long time, I never used any kind of source code control. Which was counter-productive, because tracking changes was hard, and so was managing patches.

Nowadays I'm trying to familiarise myself with Git, the SCM used for the Linux kernel and also k42. Jeff is working on a Quilt-like addition to Git called Guilt, which I learned how to use today. Guilt, like Quilt, works on a series of patches which are applied in the form of a stack. You can push and pop patches from the stack, as you build patches one on top of another.

Guilt needs to be used together with Git, although you can probably not bother with most of Git when you have Guilt in place.

See here and here for some quick tutorials to Git. You'll need to have it set up before you can use Guilt.

The first thing you need to do is to get the source (no Debian packages yet, sorry):

$ git-clone git://git.kernel.org/pub/scm/linux/kernel/git/jsipek/guilt.git

This will set up a repository in your current directory. You can use make install PREFIX=/path/to/prefix to install it after which you should be able to use Guilt.

Now, suppose you have a git repository which you want to hack on. Say, the Linux kernel.

$ git-clone git://git.kernel.org/pub/scm/linux/kernel/git/torvalds/linux-2.6.git linux-2.6

Now you have a shiny source tree with a 
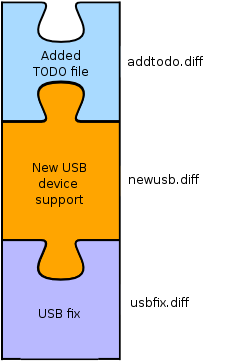
.git/ subdirectory. Now, suppose you want to release a series of patches containing, say, a USB fix, support for a new USB device, and add a TODO file.

First thing you do is initialise the git repository to work with guilt

$ guilt-init

This creates a .git/patches/master/{series,status} subdirectory which is initially empty.

Then you decide to work on the USB patch. First you create the patch (in this example named usbfix.diff):

$ guilt-new usbfix.diff

This will create a new patch, and push it onto your patch stack.

Now you can hack up some code for the USB fix, and then when you're done, you tell Guilt about your changes:

$ guilt-refresh

If you check in the .git/patches/master subdirectory, you'll find a shiny new patch named usbfix.diff. If you look at the output, it looks like a standard patch that you create using diff. The patch is created automagically!

If you want to add another patch on top of that, you can run guilt-new again:

$ guilt-new newusb.diff

Hack some more. Do a guilt-refresh.

$ guilt-refresh

You get the picture.

Now let's say you notice your first fix in usbfix.diff introduced a new bug (stuff like this happens all the time to me). So what you do is you pop the patch before usbfix.diff:

$ guilt-pop

That temporarily pops out the newusb.dif patch, allowing you to fix the code which concerns only the first patch. Once you're done fixing, run guilt-refresh again to update usbfix.diff:

$ guilt-refresh

After that, push the newusb.diff patch back onto the stack:

$ guilt-push newusb.diff

After that you can either resume working on newusb.diff, or start a new patch with guilt-new.

Now let's say you wanted to introduce a new file called TODO into the source tree, and have a patch for that.

$ guilt-new addtodo.diff

Then you create a new file called TODO and write stuff in it. After that, you add the file to Guilt:

$ guilt-add TODO

Finally, to update the patch run:

$ guilt-refresh

At the end of your hacking you'll end up with a stack of patches like in the following diagram:
Photo Sharing and Video Hosting at Photobucket

Now, if you want to mail send off the patches to your favourite developer mailing list, you pop them all out:

$ guilt-pop all

Then, you hand-edit each patch so that each includes a little description file, then push them in again in order one by one. This is a bit crude, but Jeff is working on some magic to make this easier. When you've done pushing them in again, running git-log should show you the changelog that you've done.

Finally, to mail them off, run:

$ guilt-patchbomb HEAD

A script will guide you through the process of patchbombing your mailing list.

Each patch stack is specific to whatever branch of your source tree you're working on. If you create a new branch, your Guilt files will be specific to that branch.

Good luck trying out Guilt. It's being actively developed at the moment, so expect it to become better over time :)

Monday, March 5, 2007

I Got Debian Installed From A Pendrive

Photo Sharing and Video Hosting at Photobucket

I now run Debian on my work PC!

I was pondering setting up a network boot server, until Weary suggested on irc that I could boot from a USB pendrive.

To accomplish this, download the boot image for Etch from here.

Then, zap a USB pendrive with the image (warning: this erases all data on the drive), do the following:

$ zcat boot.img.gz > /dev/sdb

This does the partitionless imaging of the drive (replace sdb with your actual USB device). If you want a partitioned USB drive, use /dev/sda1 instead. The advantage of the just writing without a partition table is that it doesn't need an MBR, reducing the number of things that could go wrong when attempting to boot from it. Be extra careful when supplying the device name, as you don't want to erase your hard drive.

Once that's done, mount the pendrive and copy over any Debian Etch .iso image that fits onto the top level directory of the filesystem on the drive, and it's ready! Plug it into your target machine, select "boot from USB" and watch it do its magic.